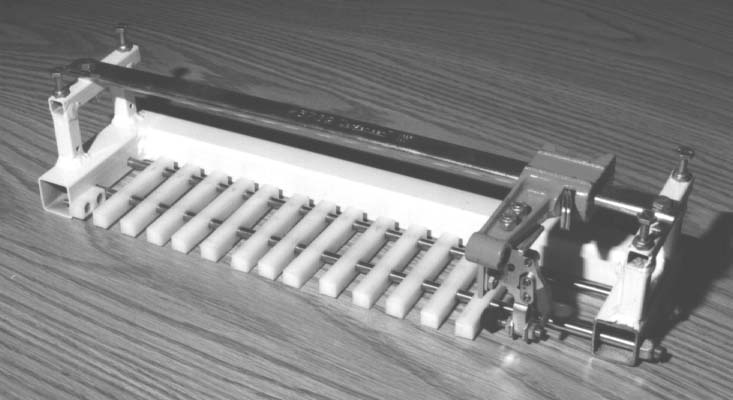
A jig that will hold 12 primary blanks for quick leathering. Floating plastic finger spacers keep the blanks
aligned and spaced properly. This design is based on the Trousdale jig made years ago.
Fig. 1 - The Primary Jig
To Use:
Place a single bottom blank (with an air hole) in the left position and move a floating finger next to it.
Place a single top blank (with the wire hole) next to the finger. This is the unit - repeat 11 more times.
Close the toggle clamp, slide the orange pony clamp to the left, open the toggle clamp and nudge it to the left
a little more, then close the toggle clamp.
Brush hide glue to the top surface of the pneumatics, then apply the leather leaving the edge about 1/3 of the
way from the end of the blanks. You will want to have the lap joint on the long side of the pneumatic, where it
will be farther away from an edge fold.
Pick up the jig and spin it top away from you to the next side. Glue the exposed surface.
Spin the jig again and glue the third surface.
Release the clamp and remove the "snake" from the jig. Glue the third and fourth surfaces without
the jig, closing up the wrap with an overlap of about 3/16"
Wait about 20 minutes, then slice each pneumatic from the snake with a sharp razor knife. Cut too soon, and the leather
moves around...... but cut too late and the glue sets up hard, and it's harder to separate if there is any oozing
of glue between blanks.
Apply the fold "set" and you are done. Repeat as desired.
Construction:
The frame is 1" steel tubing, with a modified Pony clamp on top.
A toggle clamp is mounted on the Pony Clamp for fine adjustments.
Two stainless steel rods are placed to locate the Delrin plastic fingers, which space and locate the pneumatics.
The bench top is used to line up the bottoms of each pneumatic, while the front steel rod locates the back of each pneu.
This machine was a prototype, built quick and dirty to get it done. A modern design will be cleaner and lighter.